...
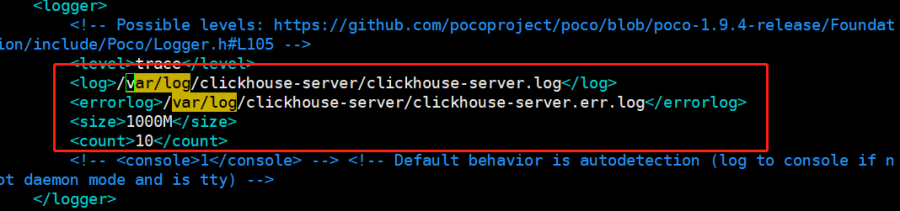
3、配置日志存放路径
修改的配置文件/etc/clickhouse-server/config.xml,配置日志路径。
3、修改默认端口4、修改默认端口
修改的配置文件/etc/clickhouse-server/config.xml,
8123是JDBC驱动的连接端口。
9000是clickhouse-client的连接端口。
一般不建议修改端口配置

...
| 代码块 |
|---|
|
echo -n "manager" | sha256sum | tr -d '-' |

设置密码

...
8、启动smartbimpp
| 代码块 |
|---|
|
systemctl start clickhouse-server |
2.6集群部署
1、2个节点全部按照上面的指导部署单节点成功后开始配置部署集群需要的配置.
以test1节点为例
...
(所有节点均需操作):
添加集群配置文件
参考附件:
...
2、重启SmartbiMPP| 代码块 |
|---|
|
systemctl restart clickhouse-server |
登录SmartbiMpp查看集群
...
...
#test1节点:
clickhouse-client --host test1 --port 9000 --database default --user default --password |
...
 manager
#test2节点:
clickhouse-client --host test2 --port 9000 --database default --user default --password |
...
 manager
#查询集群信息
select * from system.clusters; |
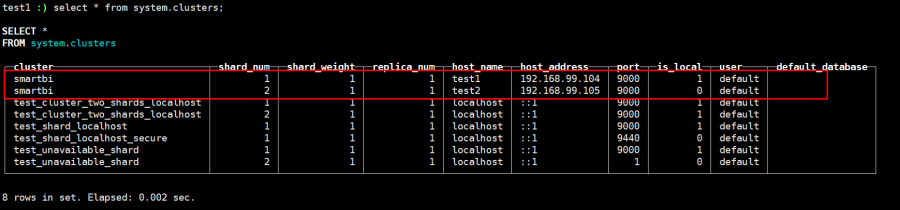
可以看到smartbi就是我们定义的集群名称,一共有2个分片,每个分片有一份数据。
5、插入数据验证集群
2个节点分别创建数据库:
#create database if not exists smartbimpp;
#show
| 代码块 |
|---|
|
create database if not exists smartbimpp;
show databases; |

6、测试分布式集群
两个节点分别创建数据表:#use smartbimpp
#CREATE TABLE
| 代码块 |
|---|
|
use smartbimpp
CREATE TABLE ontime_local (FlightDate Date,Year UInt16) ENGINE = MergeTree(FlightDate, (Year, FlightDate), 8192); |
创建分片表:
#CREATE TABLE
| 代码块 |
|---|
|
CREATE TABLE ontime_all AS ontime_local ENGINE = Distributed(smartbi, smartbimpp, ontime_local, rand()); |
分片表(Distributed)本身不存储数据,相当于路由,需要指定集群名、数据库名、数据表名、分片KEY,这里分片用rand()函数,表示随机分片。查询分布表,会根据集群配置信息,路由到具体的数据表,再把结果进行合并。
任意节点插入5条数据:
| 代码块 |
|---|
|
insert into ontime_all (FlightDate,Year)values('2001-10-12',2033); |
...
insert into ontime_all (FlightDate,Year)values('2001-10-12',2002); |
...
insert into ontime_all (FlightDate,Year)values('2001-10-12',2003); |
...
insert into ontime_all (FlightDate,Year)values('2001-10-12',2004); |
...
insert into ontime_all (FlightDate,Year)values('2001-10-12',2005); |
查询插入的数据:
| 代码块 |
|---|
|
select count(1) from ontime_all; #查看总行数 |
...
select count(1) from ontime_local; #每个节点的行数 |
每个节点查询到ontime_all的总行数都是相同的,每个查询到的ontime_local的行数之和等于ontime_all的总行数。分布式集群部署成功。
...
...
2.7测试SmartbiMPP
1、配置高速缓存库,需要在连接字符串最后面添加 ?clusterName=smartbi 参数,如下图所示。

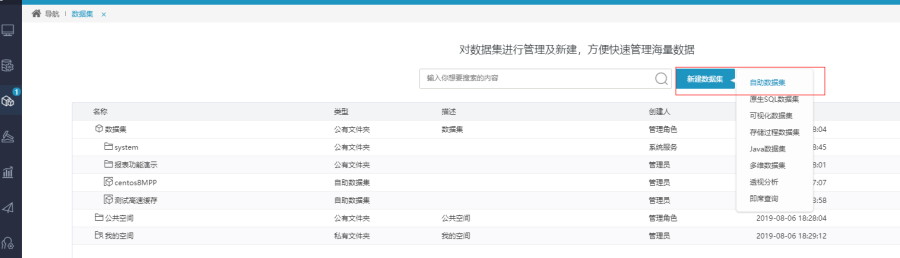
2、抽数测试
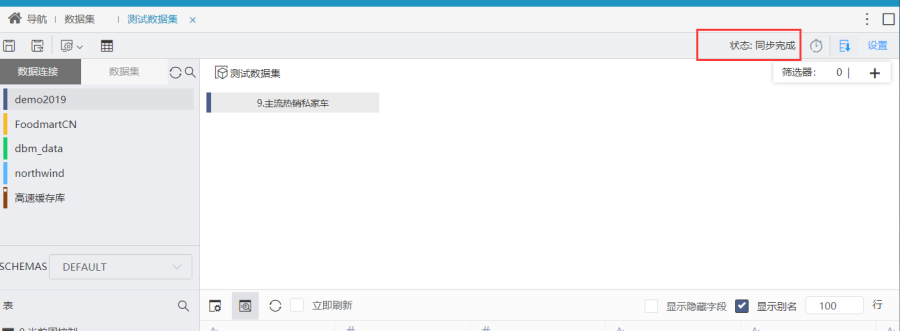
以新建自助数据集为例
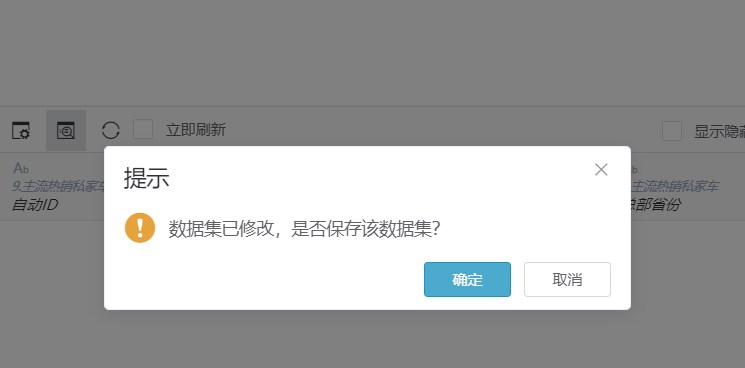
选择一个表(需要带时间字段),刷新并保存数据集

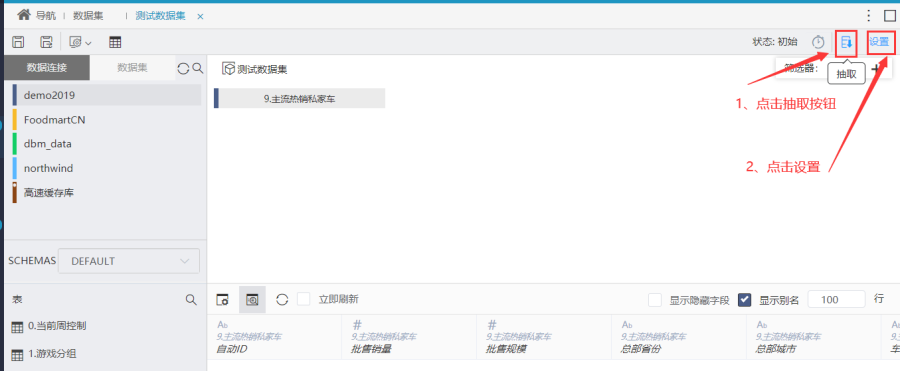

如下图,点击确定保存新的数据集
再次点击分区字段,选择分区字段和分区类型,如下图所示,并点击立即抽取开始抽数。

点击确定,开始抽取

抽取完成。
...
4、运维操作
4.1停止/启动/重启Smartbi MPP
...
|
#停止服务
systemctl stop clickhouse-server |
...
#启动服务
systemctl start clickhouse-server |
...
3重启服务
systemctl restart clickhouse-server |
...
3开机启动
systemctl enable clickhouse-server |