1、前端需要调用后端方法执行某个特定的逻辑,就是前后端有异步交互需求时,需要自定义module,在module里实现方法,前端使用util.remoteInvoke(className, methodName, paramArray, callback, that, noLookup)调用module的方法,详细见下面示例;
2、需要编写升级类(或者系统启动成功后执行的升级类)时也需要先写个module;
3、需要在插件包中执行一些系统启动初始化的操作;3、需要在扩展包包中执行一些系统启动初始化的操作;
需要知道的特性:可以在module中直接引用公共组件,譬如dao(知识库操作)、state(会话状态)、catalogtree(资源树操作)、usermanager(用户管理),常用组件对应的接口类型见 开发插件包里的说明,如下面示例就有引用catalogtree组件(自定义module里面定义了catalogTreeModule属性)。
| 代码块 | ||||||||
|---|---|---|---|---|---|---|---|---|
| ||||||||
package smartbi.framework;

/**
 * 模块接口定义。
 * 每个模块必须有一个对象实现这个接口,这个对象称为模块控制对象;
 * 除了实现这个接口,模块控制对象还应该实现一个服务定义接口。所以它的主要责任包括:
 *  1)作为模块的激活器
 *  2)作为对外的服务对象
 */
public interface IModule {
	void activate();//模块控制对象自己激活自己
} |
2.前端调用module方式
前端js使用util.remoteInvokeEx/remoteInvoke (className, methodName, paramArray, callback, that, headers) 方法调用,其中remoteInvokeEx如果同步请求出现异常会自动弹窗提示,参数说明:
className:配置再applicationContext.xml中注册到rmi中的名称,譬如下面示例中就是ExtSample8Service
methodName:要请求module中的哪个方法
paramArray:上面方法接收的参数数组,数组中的第一个对应方法的第一个参数,依次类推
callback:回调函数,请求返回执行,如果不传递此参数代表同步请求
that:callback里的this对象
headers:请求头信息,譬如:json对象,譬如{If-Modified-Since:0}
可执行示例请见 宏代码中执行sql语句 。
| 代码块 | ||||||||
|---|---|---|---|---|---|---|---|---|
| ||||||||
//以下示例只是说明用法,实际缺少很多上下文环境,并不能运行
var util = jsloader.resolve("freequery.common.util");
//同步请求方式
var ret = util.remoteInvoke("DashboardService", "getParamValueFromDashboard", [this.clientId, paramId]);
if(ret.succeeded) {
	return ret.result;
} else {
    modalWindow.showServerError(ret);
}

//异步请求方式
var ret = util.remoteInvoke("DashboardService", "getParamValueFromDashboard", [this.clientId, paramId], function(ret){
	if(ret.succeeded){
		var result = ret.result;  //getParamValueFromDashboard方法返回的结果,如果是服务端返回的是对象,这个就是个json对象
    }
}, this); |
2.Module的前后端交互原理
前面介绍了Module的编写、注册及前端如何调用,这里简单介绍里面的原理:
1、util.remoteInvoke/remoteInvokeEx实际是封装了对RMIServlet的请求,其接收三个主要参数:className、methodName、params,这三个参数就是对应remoteInvoke方法的参数
2、RMIServlet接收到className等三个参数为什么会调用对应的module,是因为RMIServlet引用了RMIModule中的modules属性,通过提供的className,找到真实对应的module,这也是为什么编写好的module需要在applicationContext.xml注册到RMIModule的原因之一,配置示例见下文。
3.示例说明
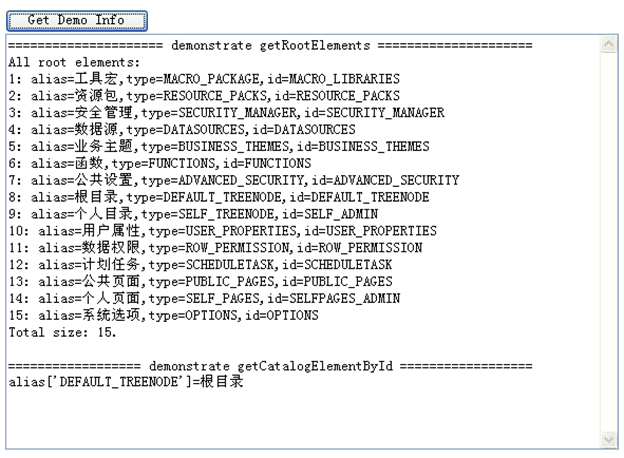
1、打开"http://localhost:18080/smartbi/vision/demo/customModuleDemo.html"并点击页面中的按钮,将会看到类似下面的结果:
2、示例中的module代码
| 代码块 | ||||||
|---|---|---|---|---|---|---|
| ||||||
package bof.ext.sample8;
import java.util.List;
import smartbi.catalogtree.CatalogTreeModule;
import smartbi.catalogtree.ICatalogElement;
import smartbi.framework.IModule;
import smartbi.sdk.service.catalog.CatalogService;
import smartbi.usermanager.local.LocalClientConnector;
public class ExtSample8Service implements IModule {
	private static ExtSample8Service _instance;
	private CatalogTreeModule catalogTreeModule;
	public CatalogTreeModule getCatalogTreeModule() {
		return catalogTreeModule;
	}
	public void setCatalogTreeModule(CatalogTreeModule catalogTreeModule) {
		this.catalogTreeModule = catalogTreeModule;
	}
	private static LocalClientConnector conn;
	protected ExtSample8Service() {
		conn = new LocalClientConnector();
	}
	public static ExtSample8Service getInstance() {
		if (_instance == null) {
			_instance = new ExtSample8Service();
		}
		return _instance;
	}
	public void activate() {
		//
	}
	@SuppressWarnings("unchecked")
	public String demoCatalogService() {
		//CatalogService catalogService = new CatalogService(conn);
		StringBuilder buff = new StringBuilder();
		/*
		 * getRootElements
		 */
		buff.append("===================== demonstrate getRootElements =====================\n");
		List<? extends ICatalogElement> elems = catalogTreeModule.getRootElements();
		if (elems != null) {
			buff.append("All root elements:");
			int len = elems.size();
			for (int i = 0; i < len; i++) {
				ICatalogElement elem = elems.get(i);
				String alias = elem.getAlias() == null ? elem.getName() : elem.getAlias();
				String type = elem.getType();
				String id = elem.getId();
				buff.append("\n").append(i + 1).append(": alias=").append(alias).append(",type=")
						.append(type).append(",id=").append(id);
			}
			buff.append("\nTotal size: " + len + ".\n");
		} else {
			buff.append("That is impossible: root elements is null.\n");
		}
		/*
		 * getCatalogElementById
		 */
		buff.append("\n================== demonstrate getCatalogElementById ==================\n");
		ICatalogElement elem = catalogTreeModule.getCatalogElementById("DEFAULT_TREENODE");
		if (elem != null) {
			buff.append("alias['DEFAULT_TREENODE']=" + elem.getAlias());
		} else {
			buff.append("That is impossible: DEFAULT_TREENODE not fount.");
		}
		//
		String result = buff.toString();
		System.out.println(result);
		return result;
	}
} |
3、修改Spring声明文件applicationContext.xml 将自定义Module对象extSample8Service配置到插件的spring声明文件中。通过自定义Module引用系统内部模块,实现系统内部方法的调用。 将自定义Module对象extSample8Service配置到扩展包的spring声明文件中。通过自定义Module引用系统内部模块,实现系统内部方法的调用。
| 代码块 | ||||
|---|---|---|---|---|
| ||||
<?xml version="1.0" encoding="UTF-8"?>
<!DOCTYPE beans PUBLIC "-//SPRING//DTD BEAN 2.0//EN" "http://www.springframework.org/dtd/spring-beans-2.0.dtd">
<beans>
		<bean id="rmi" class="smartbi.framework.rmi.RMIModule" factory-method="getInstance">
                 <property name="modules">
                          <map>
                                   <entry><key><value>ExtSample8Service</value></key><ref bean="extSample8Service" /></entry>
                          </map>
                 </property>
        </bean>
        <bean id="extSample8Service" class="smartbi.ext.sample8.ExtSample8Service" factory-method="getInstance">
		</bean>
</beans> |
4、示例代码下载 CustomModule.rar


