...
| 代码块 | ||
|---|---|---|
| ||
# cp -r <SmartbiUnionServer新版本>/etc/resource-groups.properties <SmartbiUnionServer旧版本>/etc/ |
...
2、配置账户密码
...
1)生成keystore证书及密码
| 代码块 | ||
|---|---|---|
| ||
# keytool -genkeypair -alias smartbiunionserver -keyalg RSA -validity 3650 -keystore smartbiunionserver_keystore.jks |
...
| 参数 | 参数说明 |
|---|---|
| alias | 证书别名 |
| keyalg | 加密算法,一般配置为RSA |
| validity | 证书有效期,单位是(天) |
| keystore | 指定jks证书的名称 |
如下图,按要求输入keystore证书的密码及相关信息,即可在当前目录生成smartbiunionserver_keystore.jks证书文件
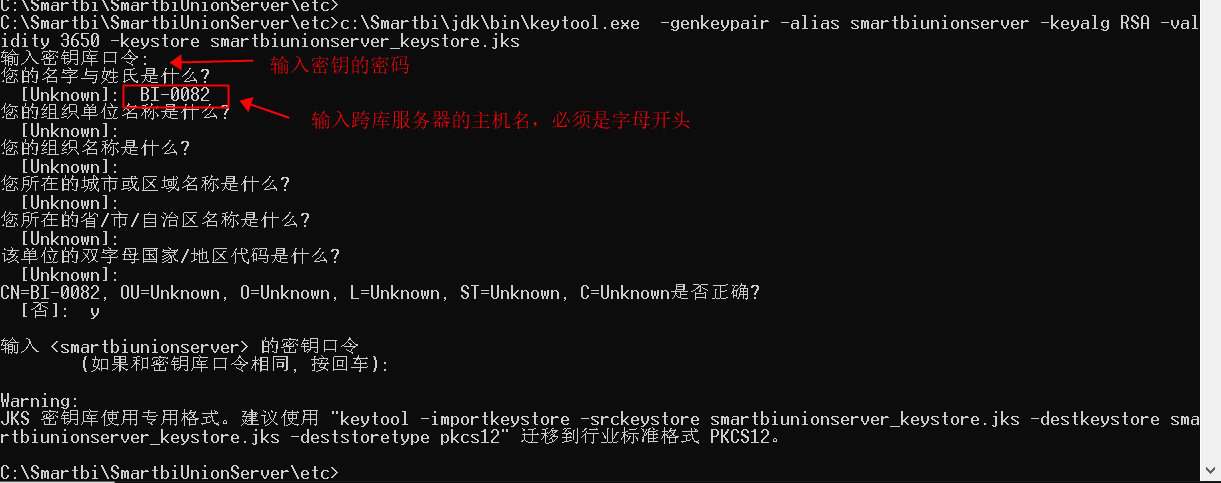
| 注意 |
|---|
1、要记住这里配置的keystore证书的密码。 2、名字与姓氏,必须填写跨库服务器的主机名称,并且主机名称需要字母开头。 |
...
2)生成cer证书
通过smartbiunionserver_keystore.jks生成cer证书
...
| 注意 |
|---|
1、alias的名字,需要和keystore证书的alias 名字一致 2、keystore 证书用证书用第一步生成的jks证书。 |

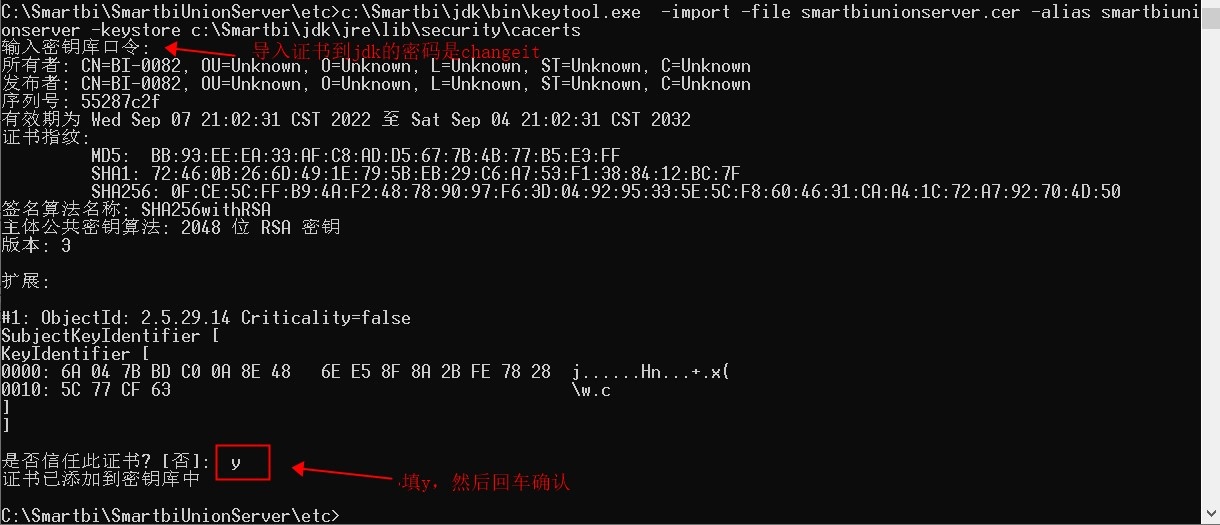
3)cer证书导入jdk的受信任证书
将第二步生成的cer证书,导入到jdk的受信任证书中
| 代码块 | ||
|---|---|---|
| ||
# keytool -import -file smartbiunionserver.cer -alias smartbiunionserver -keystore c:\Smartbi\jdk\jre\lib\security\cacerts |
| 注意 |
|---|
1、alias的名字,需要和cer证书的alias 名字一致 2、cer证书用第2步生成的cer证书 3、jdk路径,要配置跨库联合数据源使用的jdk 4、证书导入jdk环境的密码是changeit |
4)开启跨库联合数据源的https连接
修改<SmartbiUnionServer>/etc/config.properties
在config.properties中配置如下
| 代码块 | ||
|---|---|---|
| ||
httpcoordinator=true node-scheduler.include-coordinator=true query.max-memory=2GB query.max-memory-per-node=1GB discovery-server.authentication.type=PASSWORDenabled=true http-server.https.enabled=true http-server.https.port=8443 discovery.uri=https://BI-0082:8443 http-server.authentication.type=PASSWORD http-server.https.keystore.path=D:\smartbiunionserver.keystore http-serverC:\\Smartbi\\SmartbiUnionServer\\etc\\smartbiunionserver_keystore.jks http-server.https.keystore.key=manager internal-communication.https.required=true internal-communication.https.keystore.path=C:\\Smartbi\\SmartbiUnionServer\\etc\\smartbiunionserver_keystore.jks internal-communication.https.keystore.key=mypass |
...
manager
node.internal-address-source=FQDN |
配置说明:
| 参数值 | 参数说明 |
|---|---|
| http-server. |
...
| https. |
...
| enabled | 配置为true,开启https |
| http-server.https.port | 配置https端口,此处配置为8443,可以根据实际情况调整 |
| discovery.uri | 跨库联合数据源的连接url请求地址,配置为https://主机名称:https的端口. 此处必须写跨库联合数据源的服务器的主机名称,不能写ip地址。 https端口就是http-server.https. |
...
port配置的端口 |
| http-server. |
...
| authentication.type | 服务认证类型,此处配置为PASSWORD |
| http-server.https.keystore. |
...
| path | 第1步生成的jks证书路径,建议写完整的绝对路径 |
| http-server.https.keystore. |
...
| key | 第1步生成的jks证书的密码 |
| internal-communication.https.required | 配置为true,开启内部https连接请求 |
| internal-communication.https.keystore.path | 内部连接请求证书,配置为第一步生成的jks证书路径即可,建议写完整的绝对路径 |
| internal-communication.https.keystore.key | 内部连接请求证书的密码 |
| 注意 |
|---|
1、此处要禁用http请求,否则无法开启账户密码认证。 |
5)创建密码文件
下载htpasswd文件
在windows环境,运行
| 代码块 | ||
|---|---|---|
| ||
# htpasswd -B -C 10 -c password.db smartbiunionserver |
参数说明
| 参数 | 参数说明 |
|---|---|
| -B | 强制使用bcrypt算法加密密码 |
| -C | 设置bcrypt算法的计算时间,默认是5。数值越大越安全,但是会花费更多时间,建议配置4-17 |
| -c | 创建一个新的密码文件 password.db |
| smartbiunionserver | 用户名,可以自定义。 |

6)创建密码认证配置文件
创建<SmartbiUnionServer>/etc/password-authenticator.properties
| 代码块 | ||
|---|---|---|
| ||
password-authenticator.name=smartbifile cryptfile.user=admin crypt.type=SHA-256 crypt.password=8c6976e5b5410415bde908bd4dee15dfb167a9c873fc4bb8a81f6f2ab448a918 |
...
password-file=C:\\Smartbi\\SmartbiUnionServer\\etc\\password.db |
说明:
| 参数 | 参数说明 |
|---|---|
| password-authenticator. |
...
| name | 密码认证类型,配置值为file |
...
| file. |
...
| password-file |
...
| 密码文件路径,填写上一步配置生成的password. |
...
| db文件路径,建议写绝对路径 |
crypt.password:smartbiUnionserver加密后的密码7)启动
3)启动Linux:
| 代码块 | ||
|---|---|---|
| ||
# nohup ./run.sh & |
4)测试验证
2、配置账户密码
...
windows:
| 代码块 | ||
|---|---|---|
| ||
# run.cmd |
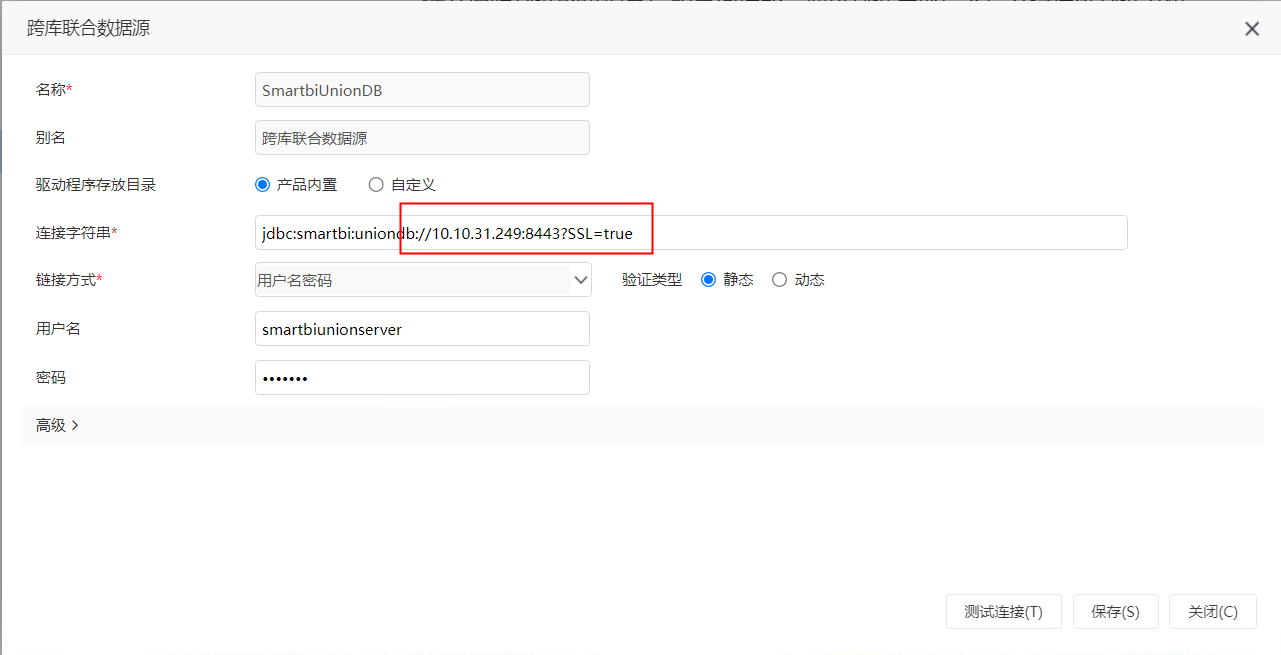
8)测试连接
连接url中,端口配置为之前配置的https端口,连接url后增加?SSL=true参数,具体如下图所示
输入配置的password.db配置的账户密码,即可进行连接。