1、系统环境准备
1.1防火墙配置
为了便于安装,建议在安装前关闭防火墙。使用过程中,为了系统安全可以选择启用防火墙,但必须启用服务相关端口。
1.关闭防火墙
临时关闭防火墙
| 代码块 | ||
|---|---|---|
| ||
systemctl stop firewalld
|
永久关闭防火墙
| 代码块 | ||
|---|---|---|
| ||
systemctl disable firewalld
|
查看防火墙状态
| 代码块 | ||
|---|---|---|
| ||
systemctl status firewalld
|
2.开启防火墙
相关服务及端口对照表:
| 服务名 | 需要开放端口 |
|---|---|
| License Server | 8700 |
如果确实需要打开防火墙安装,需要给防火墙放开以下需要使用到的端口
开启端口:8700
| 代码块 | ||
|---|---|---|
| ||
firewall-cmd --zone=public --add-port=8700/tcp --permanent
|
配置完以后重新加载firewalld,使配置生效
| 代码块 | ||
|---|---|---|
| ||
firewall-cmd --reload
|
查看防火墙的配置信息
| 代码块 | ||
|---|---|---|
| ||
firewall-cmd --list-all
|
3.关闭selinux
临时关闭selinux,立即生效,不需要重启服务器。
| 代码块 | ||
|---|---|---|
| ||
setenforce 0
|
永久关闭selinux,修改完配置后需要重启服务器才能生效
| 代码块 | ||
|---|---|---|
| ||
sed -i 's/=enforcing/=disabled/g' /etc/selinux/config
|
1.2 安装Java环境
安装包解压到/opt目录
| 代码块 | ||
|---|---|---|
| ||
tar -zxvf jdk8.0.202-linux_x64.tar.gz -C /opt
|
配置java环境变量
①执行 vi ~/.bash_profile 在文件末尾添加java环境变量参数,并保存
| 代码块 | ||
|---|---|---|
| ||
export  JAVA_HOME=/opt/jdk8.0.202-linux_x64
export  JRE_HOME=$JAVA_HOME/jre
export CLASSPATH=.:$JAVA_HOME/lib:$JRE_HOME |
/lib:$CLASSPATH
export  PATH=$JAVA_HOME/bin:$JRE_HOME/bin:$PATH
|
②使配置生效
| 代码块 | ||
|---|---|---|
| ||
source ~/.bash_profile
|
③查看java版本信息
| 代码块 | ||
|---|---|---|
| ||
java -version |
2、部署License Server
Linux环境
1、获取SmartbiLicenseServer.tar.gz安装包,并上传到服务器,解压安装包到指定路径。
| 代码块 | ||
|---|---|---|
| ||
tar -zxvf SmartbiLicenseServer.tar.gz -C /opt |
2、修改SmartbiLicenseServer.sh中JAVA_HOME的路径
| 代码块 | ||||
|---|---|---|---|---|
| ||||
cd SmartbiLicenseServer
vi StartLicenseServer.sh |
如下图所示:


| 注意 | ||
|---|---|---|
| ||
注意:SmartbiLicenseServer默认使用8700,端口,如需替换端口,可修改StartLicenseServer.sh或StartLicenseServer.bat(windows系统)中--server.port的端口号 |
保存,退出。
3、启动License Server
| 代码块 | ||||
|---|---|---|---|---|
| ||||
# 授予文件执行权限 chmod +x StartLicenseServer.sh # 在后台启动该任务进程 nohup ./StartLicenseServer.sh & |
4、浏览器中输入http://IP:PORT 登录SmartbiLicenseServer
首次登陆需要设置密码
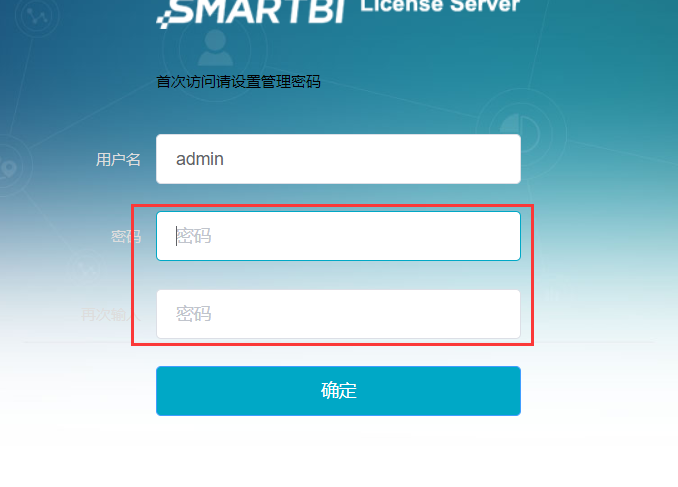

上传Smartbi-License.xml

5、停止license server 服务
ps -ef|grep smartbi-license-server|grep -v grep|awk '{print "kill -9 "$2}'|sh
Windows环境
1、安装好JAVA环境
2、解压SmartbiLicenseServer安装包
3、进入安装包,修改StartLicenseServer.bat中JAVA的安装路径,并保存退出
4、双击StartLicenseServer.bat启动SmartbiLicenseServer
5、浏览器中输入http://IP:PORT 登录SmartbiLicenseServer
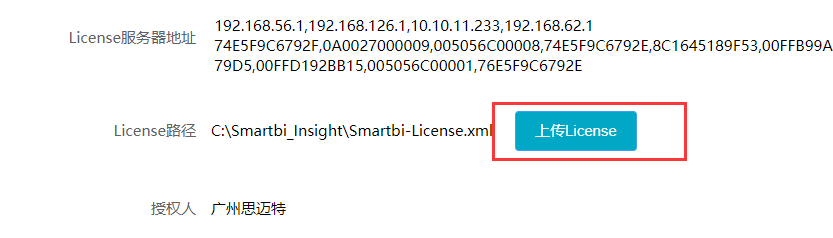
6、上传Smartbi-License.xml
其他运维操作
1、更新license
当license过期、更换正式license等情况,需要更新license时,只需登录license server控制台,重新上传license即可。
3、为Smartbi指定License Server
①参考相关Smartbi部署文档,部署好Smartbi
②登陆Smartbi配置页面
③配置Smartbi License为服务器模式,并输入Smartbi License Server地址,如下图所示:


| 注意 | ||
|---|---|---|
|
1、服务器地址填写实际部署SmartbiLicenseServer的地址和端口 |
2、smartbi节点的服务器时区和时间,必须和SmartbiLicenseServer的一致。 |
④配置完成后保存,重启Smartbi即可