1、版本更新
1)停止现有的SmartbiUnionServer服务:
# ps -ef| grep SmartbiUnionServer
# kill -9 进程id
2)升级
① 备份原来的SmartbiUnionServer/plugin目录
# mv plugin pluin_back
复制解压出来的新版SmartbiUnionServer/plugin到原来的目录文件
# cp -r <SmartbiUnionServer新版本>/plugin <SmartbiUnionServer旧版本>/plugin
② 备份原来的SmartbiUnionServer/lib目录
# mv lib lib_back
复制解压出来的新版SmartbiUnionServer/lib到原来的目录文件
# cp -r <SmartbiUnionServer新版本>/lib <SmartbiUnionServer旧版本>/lib
③ 复制SmartbiUnionServer/etc/queue_config.json 到etc目录
# cp -r <SmartbiUnionServer新版本>/etc/queue_config.json <SmartbiUnionServer旧版本>/etc/
④ 复制SmartbiUnionServer/etc/resource-groups.properties 到etc目录
# cp -r <SmartbiUnionServer新版本>/etc/resource-groups.properties <SmartbiUnionServer旧版本>/etc/
3)配置账户密码
生成keystore证书及密码
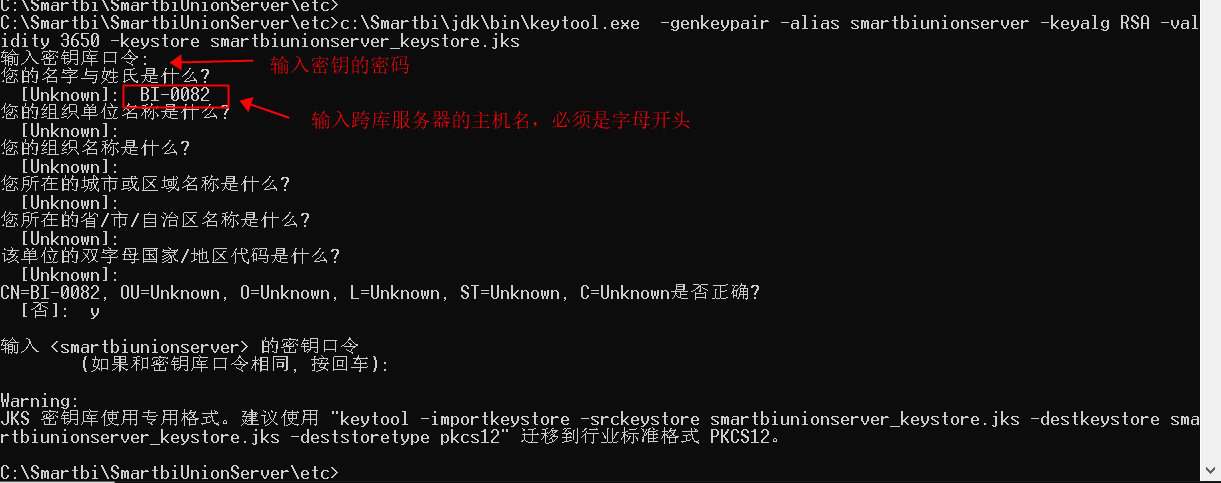
# keytool -genkeypair -alias smartbiunionserver -keyalg RSA -validity 3650 -keystore smartbiunionserver_keystore.jks
如下图,按要求输入keystore证书的密码及相关信息,即可生成smartbiunionserver_keystore.jks证书文件
注意:要记住这里配置的keystore证书的密码。
修改<SmartbiUnionServer>/etc/config.properties
在config.properties中配置如下
http-server.authentication.type=PASSWORD
http-server.https.enabled=true
http-server.https.port=8443
http-server.https.keystore.path=D:\smartbiunionserver.keystore
http-server.https.keystore.key=mypass
说明:
http-server.authentication.type:SmartbiUnionserver验证类型,此处配置为PASSWORD
http-server.https.enabled=true:配置开启https
http-server.https.port=8443:配置https服务的端口
http-server.https.keystore.path:配置https服务的keystore证书位置
http-server.https.keystore.key:配置https服务的keystore证书密码
创建<SmartbiUnionServer>/etc/password-authenticator.properties
password-authenticator.name=smartbi
crypt.user=admin
crypt.type=SHA-256
crypt.password=8c6976e5b5410415bde908bd4dee15dfb167a9c873fc4bb8a81f6f2ab448a918
说明:
password-authenticator.name:密码验证插件名称,必须配置为smartbi
crypt.user:smartbiUnionserver的用户名
crypt.type:smartbiUnionserver密码的加密方式
crypt.password:smartbiUnionserver加密后的密码
3)启动
# nohup ./run.sh &
4)测试验证
2、配置账户密码
3、测试连接